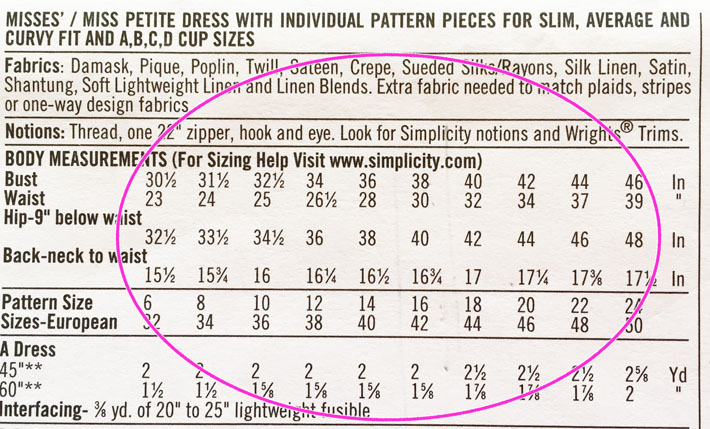
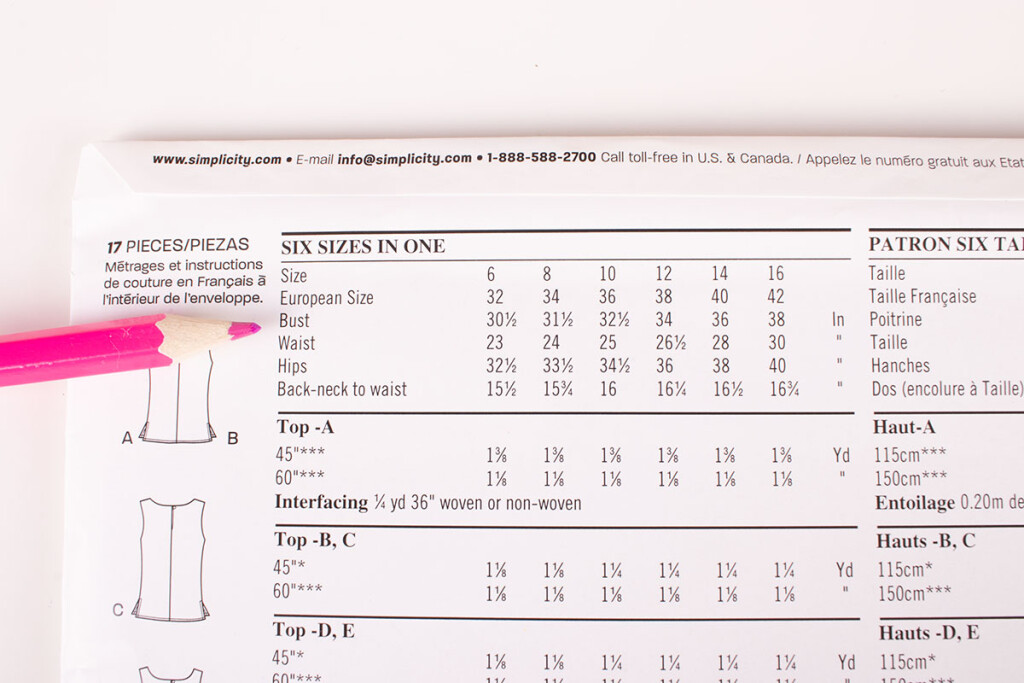
Sewing your own clothes can be incredibly rewarding, but getting the right fit is essential for a flattering and comfortable garment. How to size up a sewing pattern is the key to unlocking that perfect fit, and it’s not as complicated as it might seem. This guide will walk you through the process of understanding your measurements, interpreting pattern size charts, and making adjustments to ensure your handmade creations fit you like a glove.
From choosing the right pattern size to making adjustments for your unique body shape, we’ll cover everything you need to know to confidently sew garments that fit you beautifully. We’ll even delve into the importance of creating a muslin (a test garment) to fine-tune your fit before cutting into your precious fabric. So grab your measuring tape and let’s dive into the world of pattern sizing!
Understanding Your Measurements

The foundation of a well-fitting garment lies in accurate body measurements. Taking your measurements meticulously ensures that your chosen sewing pattern aligns perfectly with your unique shape, leading to a comfortable and flattering outcome.
Essential Body Measurements
Understanding the specific measurements required for sewing patterns is crucial. These measurements provide a detailed blueprint of your body, allowing you to select the appropriate pattern size and make necessary adjustments for a perfect fit.
- Bust: Measure around the fullest part of your bust, keeping the tape measure level and comfortable.
- Waist: Measure around the narrowest part of your waist, ensuring the tape measure is parallel to the floor.
- Hips: Measure around the fullest part of your hips, keeping the tape measure level and comfortable.
- Shoulder: Measure from the top of one shoulder bone to the top of the other shoulder bone, across the back.
- Back Length: Measure from the base of your neck (where the spine meets the neck) down to the waistline.
- Arm Length: Measure from the top of your shoulder, along the outside of your arm, to your wrist bone.
- Sleeve Length: Measure from the top of your shoulder to the desired length of your sleeve.
- Neck Circumference: Measure around your neck, just below the Adam’s apple.
- Bicep Circumference: Measure around the fullest part of your bicep, keeping the tape measure level and comfortable.
- Wrist Circumference: Measure around your wrist, keeping the tape measure level and comfortable.
Taking Accurate Measurements
Precision is key when taking body measurements. Using a flexible measuring tape and understanding key landmarks on your body will ensure accurate results.
- Use a Flexible Measuring Tape: Choose a tape measure that is flexible and easy to maneuver around curves. Avoid using a rigid tape measure, as it may not provide accurate results.
- Stand Up Straight: Maintain a natural, upright posture while taking measurements. Avoid slouching or leaning, as this can distort your measurements.
- Keep the Tape Level: Ensure the measuring tape is held parallel to the floor throughout the measurement process. This will ensure accurate results and avoid distortions.
- Identify Key Landmarks: Locate key landmarks on your body, such as the top of your shoulder bone, the fullest part of your bust, the narrowest part of your waist, and the fullest part of your hips. This will ensure you are measuring at the correct points.
- Measure Loosely: When taking measurements, ensure the tape measure is comfortable and not too tight. Allow for a little bit of ease in the measurement to ensure a comfortable fit for your garment.
- Record Your Measurements: Once you have taken all your measurements, record them carefully. This will help you choose the correct pattern size and make any necessary adjustments.
Pattern Size Charts

Pattern size charts are your guide to choosing the right pattern size for your body. They provide a framework for translating your measurements into a pattern size, ensuring a comfortable and well-fitting garment.
Understanding Pattern Size Charts
Pattern size charts use a combination of body measurements to determine the best fit for your body type. These charts are typically organized by pattern company and are designed to accommodate a wide range of body shapes and sizes.
Types of Pattern Size Charts
There are various types of pattern size charts available, catering to specific body types and sizes.
- Standard Size Charts: These charts are the most common and represent the average measurements for each size. They are designed to fit a broad range of bodies within a specific size range.
- Petite Size Charts: These charts are designed for individuals with shorter torsos and limbs. They typically adjust the length of the pattern pieces to ensure a proper fit.
- Plus Size Charts: These charts are designed for individuals with larger body measurements. They use a different size scale and adjust the pattern pieces to accommodate larger bust, waist, and hip measurements.
Interpreting Pattern Size Charts
Each pattern size chart will list a set of measurements corresponding to a specific size.
For example: A size 10 pattern may list a bust measurement of 34″, a waist measurement of 26″, and a hip measurement of 37″.
It is crucial to compare your body measurements with the measurements listed on the pattern size chart to determine the best fit.
Comparing and Contrasting Size Charts
It’s essential to understand that different pattern companies may use different size charts and measurements.
- Size discrepancies: A size 10 in one pattern company may not correspond to a size 10 in another pattern company. This is why it’s crucial to always refer to the specific pattern size chart provided with the pattern.
- Measurement variations: Different pattern companies may also use slightly different measurement methods, which can lead to variations in the final garment fit.
For example: One pattern company may measure the bust at the fullest point, while another may measure it at the underbust level. These variations can impact the fit of the garment, even if the listed size is the same.
Therefore, it is essential to always compare your measurements with the specific pattern size chart provided with the pattern and not rely on previous experiences with other pattern companies.
Choosing the Right Pattern Size: How To Size Up A Sewing Pattern

Choosing the right pattern size is crucial for achieving a flattering and well-fitting garment. It’s not just about your overall size but also considering your individual body shape, the desired fit, and the stretchiness of the fabric.
Understanding Pattern Ease, How to size up a sewing pattern
Pattern ease is the extra fabric added to the pattern to allow for comfort and movement. It’s the difference between your body measurements and the pattern’s measurements.
“Ease is the difference between the garment’s finished measurements and your body’s measurements. It’s the amount of looseness or tightness you want in the garment.”
The amount of ease needed depends on the style of the garment and the desired fit. For example, a loose-fitting top will require more ease than a fitted dress.
Factors to Consider When Choosing a Pattern Size
- Body Shape: Different pattern sizes are designed for different body shapes. For example, a pattern designed for a pear-shaped figure will have a different fit than a pattern designed for an hourglass figure.
- Desired Fit: The desired fit of the garment will also influence the pattern size you choose. A loose-fitting garment will require a larger pattern size than a fitted garment.
- Fabric Stretch: The amount of stretch in the fabric will affect the final fit of the garment. Stretchy fabrics require a smaller pattern size than non-stretchy fabrics.
Choosing the Right Pattern Size Based on Your Measurements
- Measure Your Body: Accurately measure your bust, waist, and hips using a measuring tape. Make sure the tape is snug but not too tight.
- Refer to the Pattern Size Chart: Compare your body measurements to the pattern size chart. The chart will indicate the pattern size that corresponds to your measurements.
- Consider Ease: Take into account the desired ease for the garment and the fabric’s stretchiness. If you want a loose-fitting garment or are using a stretchy fabric, you may need to choose a larger pattern size.
- Try a Sample: If you’re unsure about the pattern size, try making a sample garment in a scrap fabric. This will help you determine if the pattern size is right for you.
With a little practice and attention to detail, you’ll be able to confidently size up any sewing pattern and create garments that fit you perfectly. Remember, the key is to understand your body measurements, interpret pattern size charts, and be willing to make adjustments as needed. Don’t be afraid to experiment and learn from your mistakes—that’s how you’ll become a master of pattern sizing! So go forth and sew with confidence, knowing that your garments will be both stylish and comfortable.
FAQs
What if I don’t have a sewing pattern?
You can create your own pattern by drafting it directly on fabric or using a sloper, which is a basic pattern based on your body measurements.
Can I use a pattern designed for a different body type?
Yes, you can use a pattern designed for a different body type, but you’ll need to make adjustments to ensure it fits you correctly. This may involve altering the bust, waist, or hip measurements.
How do I know if I need to adjust the pattern for ease?
Ease refers to the amount of looseness or tightness you want in your garment. Most patterns include ease in their measurements, but you can adjust it based on your preference and the type of fabric you’re using.
Is it always necessary to create a muslin?
While creating a muslin is highly recommended, especially for complex garments, it’s not always necessary. If you’re confident in your pattern-sizing skills and the garment is relatively simple, you may be able to skip the muslin step.


