
How to whitelist a domain in Office 365? This seemingly simple question opens a world of enhanced security and streamlined collaboration within your organization. Understanding how to properly whitelist domains is crucial for preventing email filtering issues, ensuring seamless file sharing in SharePoint and OneDrive, and facilitating secure communication in Microsoft Teams. This guide will walk you through the process, highlighting the benefits, potential pitfalls, and best practices for each Office 365 service, empowering you to manage your digital environment with confidence and control.
We’ll explore the different methods for whitelisting domains across various Office 365 applications, providing clear, step-by-step instructions. We’ll also delve into troubleshooting common issues and offer preventative measures to maintain a secure and efficient workflow. By the end, you’ll be equipped to confidently manage your domain whitelists and optimize your Office 365 experience.
Understanding Office 365 Domain Whitelisting

Source: alitajran.com
Okay, so like, domain whitelisting in Office 365 is, like, totally crucial for keeping your digital life safe and secure. Think of it as a VIP list for your emails and files – only the peeps on the list get in. It’s all about boosting security and preventing those pesky phishing attempts and malware from crashing the party.
Seriously, whitelisting specific domains is, like, a major security upgrade. It’s a total game-changer because it blocks emails and files from unknown or untrusted sources. This helps keep your inbox spam-free and prevents nasty viruses from infecting your systems. It’s like having a super-powered bouncer at the door of your digital world.
Identifying Domains Requiring Whitelisting
Figuring out which domains need to be on your whitelist is, like, the first step. You’ll wanna check which domains your apps and services use to send and receive emails, files, and other data. Think about all the places you use your Office 365 apps – like, if you use a specific service for project management, you’ll probably need to whitelist its domain.
If you’re using third-party apps that integrate with Office 365, you’ll need to whitelist those too. Basically, if you’re getting important stuff from a certain place, you gotta add it to the list. It’s all about making sure your communication flows smoothly and securely.
Whitelisting Methods Across Office 365 Services
This table breaks down how to whitelist domains in different Office 365 services. It’s super helpful for keeping things organized and knowing exactly what to do in each case.
| Service | Method | Steps | Considerations |
|---|---|---|---|
| Exchange Online | Connectors, Transport rules | 1. Navigate to the Exchange admin center. 2. Configure mail flow rules to allow or block emails based on sender domain. 3. Set up mail connectors for trusted domains. | Consider using both connectors and transport rules for comprehensive control. Make sure you test your rules to avoid blocking legitimate emails. |
| SharePoint Online | SharePoint admin center settings | 1. Access the SharePoint admin center. 2. Configure trusted domains under external sharing settings. | Ensure you only whitelist domains you fully trust. Review your settings periodically to prevent unauthorized access. |
| Microsoft Teams | Teams admin center settings | 1. Go to the Teams admin center. 2. Configure allowed domains for external access. | This helps prevent unauthorized access to your Teams environment. Thoroughly test the settings before deploying to avoid disruptions. |
Whitelisting Domains for Email
Okay, so like, you know how sometimes emails from, like, your BFF or your fave online store end up in the spam folder? Total bummer, right? Whitelisting domains is the total solution to that drama. It’s basically telling Office 365, “Hey, trust these peeps; their emails are legit!”Whitelisting prevents email filtering issues by creating a safe list for specific email domains.
Think of it as a VIP pass for emails. When you whitelist a domain, Office 365 skips the usual spam checks for emails coming from that domain, making sure they land safely in your inbox. No more frantic searches in the spam folder!
Common Scenarios Requiring Email Domain Whitelisting
Whitelisting is super useful in a bunch of situations. For example, if you’re expecting important emails from a specific company, like a job application update or a confirmation from a legit online store, whitelisting their domain ensures you get those emails ASAP. Another scenario is when you regularly communicate with someone whose emails might be flagged as spam because of the way their email server is set up.
Whitelisting their domain keeps those emails from getting lost in the digital abyss.
How Whitelisting Prevents Email Filtering Issues
Email filtering systems use various methods to identify and filter spam, including checking sender reputation, email content analysis, and identifying suspicious links. Whitelisting bypasses these checks for specified domains. This is particularly useful when legitimate emails are being incorrectly flagged as spam due to factors like the sender’s IP address or the content of the email. By whitelisting, you’re essentially saying, “I know this sender, trust them!”
Implications of Incorrectly Whitelisting a Domain
Okay, so this is where things can get a little dicey. If you accidentally whitelist a sketchy domain, you’re basically giving spammers a free pass to your inbox. This could lead to a flood of unwanted emails, phishing attempts, or even malware. So, before you whitelist a domain, double-check that it’s totally legit. Don’t just trust a random email telling you to whitelist something; do your research!
Adding a Domain to the Safe Senders List in Outlook, How to whitelist a domain in office 365
This is where things get a little techy, but don’t stress! It’s pretty straightforward. 
Whitelisting Domains for SharePoint Online and OneDrive: How To Whitelist A Domain In Office 365
Okay, so you wanna make sure only certain peeps can access your SharePoint and OneDrive files, right? Totally get it – privacy is key, especially when you’re dealing with, like, super important stuff. Whitelisting domains lets you control who gets in, keeping your files safe from prying eyes. Think of it as having a super exclusive VIP list for your digital documents.
Whitelisting domains for SharePoint Online and OneDrive is all about setting up access control based on the internet address of the user’s organization. This is done through SharePoint’s admin center, where you can specify which domains are allowed to access your files. This helps maintain data security and makes sure only authorized users can collaborate.
SharePoint Online Domain Whitelisting Configuration
Setting up domain whitelisting in SharePoint is pretty straightforward, fam. You’ll head to the SharePoint admin center, then to the settings for external sharing. There, you’ll find options to restrict access to only specific domains. It’s like setting up a guest list for your digital party. You can choose to allow only users from certain domains to access your files or even specific folders within SharePoint or OneDrive.
You can even add or remove domains whenever you need to – super flexible.
Managing External Sharing Permissions with Whitelisted Domains
Once you’ve got your whitelisted domains all set up, managing external sharing permissions is a breeze. You can set different permission levels for each whitelisted domain. For example, you could give one domain full access to edit files, while another only has view-only permissions. It’s all about tailoring access based on the level of trust and the need-to-know for each external group.
You can manage these settings through the SharePoint admin center, directly on the file or folder level, and even through PowerShell for more complex scenarios.
Troubleshooting Whitelisting Domain Issues for File Sharing
Sometimes things go sideways, even with the best laid plans. Here are some common issues you might run into when setting up domain whitelisting and how to totally slay ’em:
Here are some common problems and how to fix them:
- Problem: Users from a whitelisted domain can’t access files. Solution: Double-check that the domain is correctly entered in the SharePoint admin center’s external sharing settings. Make sure there are no typos and that the domain is fully qualified (e.g., example.com, not just example).
- Problem: Users from a whitelisted domain have incorrect permissions. Solution: Verify the permission levels assigned to that specific domain. It’s possible the permissions were accidentally set too restrictively. You can easily adjust permissions in the SharePoint admin center.
- Problem: SharePoint isn’t recognizing the domain. Solution: This could be due to DNS issues. Make sure your DNS settings are correctly configured, and that the domain’s records are properly propagated. If you’re still stuck, reach out to your IT team for help. They’re the pros!
- Problem: External users are getting error messages. Solution: Carefully examine the error message. It often contains clues about what went wrong. You might need to check your network settings, or it might be a problem on the user’s end.
Whitelisting Domains for Microsoft Teams

Source: alitajran.com
Okay, so like, you wanna keep your Teams chats and files safe from, you know,total strangers*? Whitelisting domains is your jam. It’s basically creating a VIP list for who can access your Teams stuff. Think of it as a super-exclusive party – only invited guests get in!
Adding allowed domains for external access in Microsoft Teams is pretty straightforward, but it’s
-super* important for security. It lets you control who can chat, share files, and generally hang out in your Teams workspace. This means less random peeps snooping around and more control over your data. It’s like having a bouncer at the door of your digital clubhouse, only letting in the peeps with the right credentials.
Configuring Teams to Allow Communication Only with Specific Whitelisted Domains
To do this, you gotta go into your Microsoft Teams admin center. It’s a bit like navigating a maze, but once you get the hang of it, it’s totally manageable. You’ll find settings for external access, and that’s where the magic happens. You’ll see options to add specific domains to your whitelist. Once you add a domain, only users from that domain can connect with your team.
It’s like setting up a super-strict guest list for your online hangout. No uninvited guests allowed!
Security Implications of Allowing Guest Access from Whitelisted Versus Un-whitelisted Domains
Allowing guest access from
whitelisted* domains is way safer than letting anyone in. Think of it like this
whitelisting is like having a guest list at a party. You only invite people you know and trust. Un-whitelisted access is like leaving the door open – anyone can waltz in, and that’s a major security risk. With whitelisting, you’re controlling who gets access to sensitive information, limiting the potential damage from a security breach. It’s like having a really strong password – way better than using “password123”!
Access Control Levels for Whitelisted Domains in Microsoft Teams
This table breaks down the different levels of access you can set for those whitelisted domains:
| Access Level | Description | Configuration Steps | Security Implications |
|---|---|---|---|
| Full Access | Guests from the whitelisted domain have full access to all channels and files. | Add the domain to the allowed external access list in the Teams admin center. | Higher risk, but allows for seamless collaboration. Requires careful monitoring and strong internal security measures. |
| Limited Access | Guests can only access specific channels or teams, and their access might be restricted to viewing only. | Configure channel and team permissions within Teams, restricting access for the whitelisted domain. | Lower risk, but might hinder collaboration if not managed properly. Provides better control over data exposure. |
| Read-Only Access | Guests can only view content, they can’t edit or contribute. | Set appropriate permissions within Teams to restrict editing capabilities for the whitelisted domain. | Lowest risk, good for sharing information without allowing changes. Might limit the effectiveness of collaborative efforts. |
| No Access | Guests from this domain are blocked entirely. | Remove the domain from the allowed external access list. | Lowest risk, but prevents any collaboration with this domain. |
Troubleshooting Whitelisting Issues
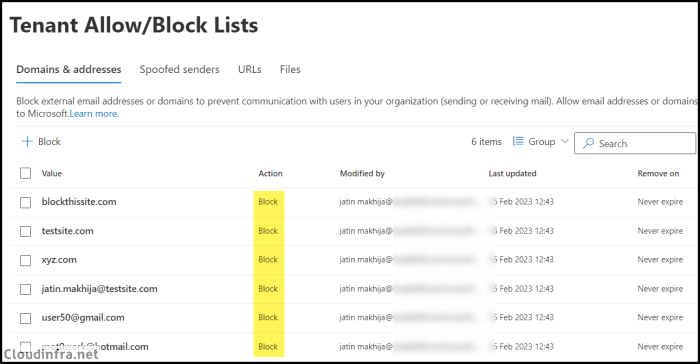
Source: cloudinfra.net
Okay, so you’ve been trying to whitelist your domain in Office 365, and it’s, like, totally not working. Don’t freak out! It happens more often than you think. This section’s all about fixing those pesky whitelisting problems. We’ll cover some common errors, their causes, and how to totally nail that fix.
Common Whitelisting Errors and Their Causes
Sometimes, things just go sideways. Here are some common issues you might run into while trying to whitelist your domain, along with why they happen. Think of it as a cheat sheet for your Office 365 woes.
- Email Not Delivering: This is a major bummer. It usually means the domain isn’t correctly whitelisted, or there’s a problem with your email server settings. Maybe you typed something wrong, or there’s a conflict with other security rules.
- SharePoint/OneDrive Access Issues: Can’t access your files? The domain might not be whitelisted for SharePoint or OneDrive access. Double-check your settings and make sure you’re using the correct URLs.
- Microsoft Teams Connectivity Problems: If Teams is acting up, it could be a whitelisting problem. Make sure the domain is properly added to the allowed list for Teams.
- Error Messages: Pay attention to any error messages you see! They’re usually pretty helpful and point you in the right direction. They often contain clues about what’s gone wrong. Take notes!
Resolving Common Domain Whitelisting Problems
Alright, so you’ve got a problem. Here’s how to totally fix it.
- Double-Check Your Work: Seriously, go back and check your settings. Did you mistype anything? Is the correct domain name entered? Are there any typos in the URL? This is the most common cause of problems.
It’s like, the low-hanging fruit.
- Restart Services: Sometimes, a simple restart can fix a lot of issues. Restart your computer, your email client, and your Office 365 apps. It’s like hitting the reset button.
- Check Your DNS Records: Make sure your DNS records are correctly configured. This is super important for email delivery. If they’re messed up, your emails won’t get through.
- Contact Support: If you’re still stuck, don’t hesitate to reach out to Office 365 support. They’re pros and can help you troubleshoot more complex problems.
Verifying Successful Whitelisting
You’ve done the work. Now it’s time to see if it worked.
The best way to verify is to test it. Send a test email from an external account to an account within your organization. If the email arrives without issues, you’re good to go. For SharePoint and OneDrive, try accessing files and folders. For Teams, try joining a team or sending a message.
If everything works smoothly, then congrats!
Troubleshooting Guide: A Decision Tree
Let’s make this super simple. This decision tree will help you troubleshoot your whitelisting problems.
Step 1: Is the issue related to email, SharePoint/OneDrive, or Teams?
Step 2 (Email): Did you double-check your domain name and DNS records? If yes, try restarting your services. If no, do it now! Still issues? Contact support.
Step 2 (SharePoint/OneDrive): Are you using the correct URLs? Try restarting your browser and Office 365 apps. Still issues? Contact support.
Step 2 (Teams): Is the domain whitelisted in Teams admin center? If yes, try restarting your Teams app. If no, add it now! Still issues? Contact support.
Best Practices for Domain Whitelisting
Okay, so you’ve whitelisted some domains in Office 365 – totally rad! But, like, keeping things secure and up-to-date is key, you know? This isn’t some one-and-done deal; it’s about making sure your digital pad is safe from any bogus stuff. Think of it like locking your bedroom door – you wouldn’t leave it unlocked all the time, right?Regularly reviewing and updating your whitelisted domains is, like, super important.
It’s not just about initial setup; it’s about ongoing maintenance to keep your Office 365 environment totally secure and prevent any unwanted access. Think of it as regularly checking your social media accounts – you wouldn’t leave them untouched forever, would you?
Regular Review and Updates of Whitelisted Domains
Yo, imagine this: you whitelist a domain, and then, like, six months later, that company goes belly up or gets hacked. Suddenly, you’ve got a security hole, which is, like, a total buzzkill. To avoid this, schedule regular reviews – maybe quarterly or even monthly, depending on how many domains you’re managing and how often things change. Delete any domains that are no longer needed, and verify that the domains still need to be whitelisted.
Think of it as spring cleaning for your digital space. It’s all about keeping things fresh and relevant.
Securing Whitelisted Domains
Dude, securing these whitelisted domains is, like, a big deal. You don’t want some random dude sneaking into your digital crib, right? One solid way to do this is by using strong passwords and multi-factor authentication (MFA) for all accounts associated with those domains. MFA is like adding a second lock to your door – seriously increases the security.
Also, regularly update your software and security protocols. It’s like getting a flu shot – it’s preventative medicine for your digital world.
Checklist for Secure Domain Whitelisting Implementation
Before you go wild whitelisting everything, let’s create a killer checklist. This is your digital safety net.
Before you start, make sure you have a solid plan and understand the implications. This ain’t something you want to wing.
- Identify all necessary domains: Make a list of every domain that needs access. Don’t just guess – be thorough!
- Verify domain legitimacy: Before adding a domain, make sure it’s legit. Don’t trust just any random link.
- Implement strong passwords and MFA: This is your first line of defense against unwanted access.
- Regularly review and update your whitelist: This should be part of your ongoing security routine.
- Document your process: Keep a record of which domains are whitelisted and why. This will help you in the future.
- Test your configuration: After making changes, test to ensure everything works as expected.
Following this checklist will totally up your security game and keep your Office 365 environment safe from any digital shenanigans.
Conclusive Thoughts
Successfully whitelisting domains in Office 365 significantly enhances your organization’s security posture and improves collaboration. By carefully following the steps Artikeld in this guide and adhering to best practices, you can effectively manage your whitelists, preventing email delivery problems, ensuring secure file sharing, and facilitating controlled communication within Microsoft Teams. Remember to regularly review and update your whitelisted domains to maintain optimal security and efficiency.
Proactive management of your domain whitelists is key to a smooth and secure Office 365 experience.
Answers to Common Questions
What happens if I whitelist the wrong domain?
Whitelisting the wrong domain can expose your organization to security risks, allowing unwanted emails or access from untrusted sources. It’s crucial to carefully verify the domain before adding it to your whitelist.
How often should I review my whitelisted domains?
Regularly reviewing your whitelisted domains, at least quarterly, is recommended. This ensures that only trusted domains remain on the list and helps mitigate potential security threats.
Can I whitelist a wildcard domain?
The ability to whitelist wildcard domains varies depending on the Office 365 service. Some services support it, while others may require whitelisting individual domains. Consult the specific service documentation for details.
What if I accidentally remove a necessary domain from my whitelist?
If you accidentally remove a necessary domain, you may experience issues with email delivery, file sharing, or communication in Teams. Immediately add the domain back to the whitelist and check for any resulting problems.


