
How to measure a graduated cylinder – a seemingly simple task, yet it holds the key to unlocking accurate scientific discovery. Think about it: every experiment, every chemical reaction, every carefully crafted concoction often hinges on this one skill. It’s a journey into the heart of precision, a dance between liquid and glass, where a slight misread can skew an entire investigation.
We’ll delve into the world of graduated cylinders, exploring their purpose, their construction, and the crucial steps that lead to flawless measurements. Prepare to be captivated by the subtle art of reading the meniscus, the secrets of liquid displacement, and the importance of accuracy in a world demanding precision.
We’ll start by understanding the graduated cylinder itself. It’s more than just a tube; it’s a vessel of purpose, meticulously crafted for the accurate measurement of liquid volumes. We’ll explore the different types, from the tall, slender forms designed for precision to the short, stout varieties built for convenience. We’ll also examine the materials that make up these essential tools, from the durable glass to the sturdy plastic, each with its own advantages.
Then, we will dive into the preparation, cleaning, and inspection of a graduated cylinder, understanding the significance of selecting the right size, and the importance of safety when handling these delicate instruments. Next, we will understand how to accurately read the meniscus, the curved surface of a liquid in a graduated cylinder, and the techniques needed to master it.
Understanding the Graduated Cylinder
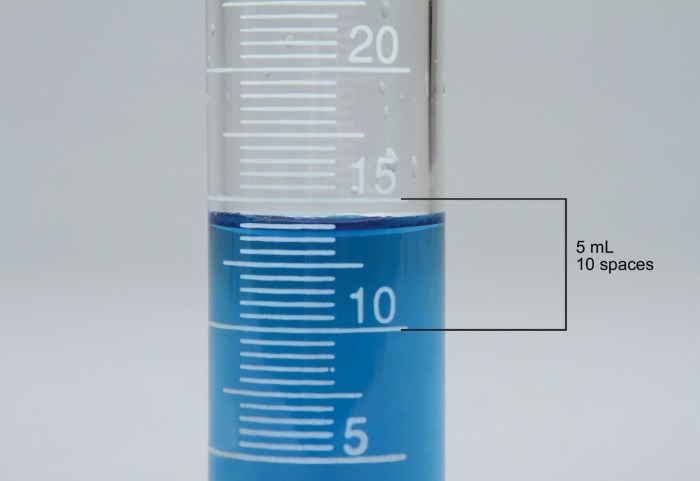
The graduated cylinder is a fundamental piece of laboratory equipment used for the precise measurement of liquid volumes. Its design and construction are crucial to ensuring accurate and reliable results in various scientific applications, ranging from chemistry and biology to environmental science and pharmaceutical research. The following sections will explore the graduated cylinder’s purpose, types, and materials.
Purpose and Significance
The primary function of a graduated cylinder is to accurately measure and dispense specific volumes of liquids. This precision is vital for experiments where the concentration of solutions, the stoichiometry of reactions, or the volumes of reactants are critical. Unlike beakers and flasks, which are primarily designed for mixing and containing liquids, graduated cylinders are calibrated for precise volumetric measurements.
Types of Graduated Cylinders
Graduated cylinders are manufactured in different forms to suit various experimental needs. These variations influence their accuracy and usability.* Tall-Form Graduated Cylinders: These cylinders are characterized by their height, which is typically several times greater than their diameter. The tall, slender design minimizes the surface area exposed to the liquid, reducing the error caused by meniscus formation. They are often preferred for general-purpose measurements where high precision is required.* Short-Form Graduated Cylinders: Also known as Griffin form, these cylinders have a shorter, wider shape.
This design offers greater stability and is often used when the contents need to be easily swirled or mixed. While they are generally less accurate than tall-form cylinders, they are more convenient for certain applications.* Graduated Cylinders with Stopper: Some graduated cylinders are designed with a ground-glass stopper. This feature allows for the temporary storage of liquids, minimizing evaporation or contamination, especially useful for volatile solvents or solutions that need to be protected from the atmosphere.
Materials of Construction
The choice of material for a graduated cylinder is critical, as it impacts the cylinder’s durability, chemical resistance, and thermal properties.* Borosilicate Glass: This is the most common material for graduated cylinders. Borosilicate glass, such as Pyrex or Kimax, is highly resistant to thermal shock, meaning it can withstand rapid temperature changes without cracking. It also exhibits excellent chemical resistance to a wide range of chemicals, making it suitable for use with many solvents and reagents.
Measuring with a graduated cylinder requires precision; always read at eye level to the meniscus. But what if you need a specific volume? That’s when you might start wondering about how many cylinders are needed to achieve the desired total. Once you’ve determined that, return to carefully measuring each cylinder’s contents, ensuring accuracy for your experiment.
The transparency of borosilicate glass allows for easy visualization of the liquid meniscus, facilitating accurate readings.* Polypropylene (PP): Polypropylene graduated cylinders are an alternative to glass, particularly in situations where breakage is a concern. PP is lightweight, durable, and chemically resistant to many substances. However, it is less resistant to some organic solvents and cannot withstand high temperatures like borosilicate glass.
PP cylinders are also less transparent, making it somewhat more challenging to read the meniscus accurately.* Polymethylpentene (PMP): PMP, also known as TPX, is another type of plastic used in the construction of graduated cylinders. It offers good clarity and is resistant to a wide range of chemicals. PMP is also autoclavable, meaning it can be sterilized using heat and pressure, which is essential for certain laboratory procedures.
For instance, consider a chemist preparing a solution of hydrochloric acid. Using a borosilicate glass graduated cylinder is essential due to the glass’s resistance to the corrosive nature of the acid and its ability to withstand any temperature changes that might occur during the mixing process. Alternatively, in a biology lab, a polypropylene graduated cylinder might be used for measuring water or buffer solutions, where the risk of breakage is a higher concern.
Preparing for Measurement: How To Measure A Graduated Cylinder

Accurate measurement with a graduated cylinder requires meticulous preparation. This involves ensuring the cylinder is clean, selecting the appropriate size for the volume being measured, and handling the cylinder with care to prevent breakage and ensure the safety of the user. These steps are crucial for obtaining reliable and reproducible results in any scientific experiment or application.
Cleaning and Inspection
Prior to using a graduated cylinder, thorough cleaning and inspection are essential. This process eliminates potential sources of error and ensures the integrity of the measurements.The cleaning process typically involves the following steps:
- Rinsing: The cylinder should be rinsed with distilled or deionized water to remove any loose debris or contaminants. If the cylinder is being used for a specific chemical, rinse with the chemical itself before use to ensure that any residue doesn’t dilute the solution.
- Washing: For more thorough cleaning, use a mild detergent solution. Introduce the detergent solution into the cylinder, swirl it around to ensure it contacts all surfaces, and then rinse thoroughly with water. Avoid using abrasive cleaners that could scratch the glass or plastic.
- Drying: Allow the cylinder to air dry, or use a clean, lint-free cloth to dry the exterior. Do not use heat to dry the cylinder, as this could damage the material or introduce temperature-related errors in subsequent measurements.
Inspection is equally important:
- Checking for Cracks: Carefully examine the cylinder for any cracks, chips, or other damage. A cracked cylinder is a safety hazard and will not provide accurate measurements. Discard any damaged cylinders.
- Observing Clarity: Ensure the cylinder is clear and transparent. Cloudiness or discoloration can interfere with the accurate reading of the meniscus.
- Examining Markings: Verify that the graduation markings are clear, legible, and intact. Ensure that the markings have not been rubbed off or faded, as this can lead to measurement errors.
Selecting the Appropriate Size Graduated Cylinder
Choosing the correct size graduated cylinder is critical for accurate measurements. Using a cylinder that is too large or too small can significantly impact the precision of the measurement.The primary consideration is to select a graduated cylinder whose capacity is as close as possible to the volume being measured, without exceeding it.For instance:
- Example 1: If you need to measure 25 mL of a liquid, a 25 mL graduated cylinder is the ideal choice. Using a 50 mL cylinder for this measurement would reduce accuracy because the markings would be further apart, making it harder to read the volume precisely.
- Example 2: If you need to measure 5 mL of a liquid, using a 10 mL graduated cylinder would be more accurate than using a 100 mL cylinder. The 10 mL cylinder offers finer graduations, allowing for a more precise measurement of the smaller volume.
- Example 3: If measuring a series of volumes, consider using different size cylinders. For instance, if you need to measure 10 mL, 25 mL, and 50 mL, it would be appropriate to use a 10 mL, 25 mL, and 50 mL graduated cylinder respectively, if available.
The principle is to avoid using a cylinder that is significantly larger than the volume to be measured, as this reduces the precision of the measurement. It is also important to consider the uncertainty of the measurement, which is typically half the smallest graduation mark on the cylinder.
Handling and Safety Precautions, How to measure a graduated cylinder
Proper handling and safety precautions are essential when working with graduated cylinders to prevent breakage and ensure the safety of the user and the surrounding environment.These precautions include:
- Grip: Always hold the cylinder firmly near the top and base, using both hands if necessary, especially when handling larger volumes or when transferring liquids. This minimizes the risk of dropping the cylinder.
- Placement: Place the cylinder on a stable, level surface when measuring or transferring liquids. This prevents accidental tipping and spills.
- Filling: When filling the cylinder, pour the liquid slowly and carefully, directing the stream down the side of the cylinder to minimize splashing and bubble formation.
- Transport: When transporting a filled cylinder, carry it upright and with both hands. Be mindful of obstacles and other people in the area.
- Material Compatibility: Ensure the graduated cylinder is compatible with the chemical being used. Some chemicals can react with glass or plastic, causing damage to the cylinder or contaminating the solution. Always consult a chemical compatibility chart.
- Eye Protection: Always wear appropriate eye protection, such as safety glasses or goggles, to protect against splashes or spills.
- Gloves: Wear gloves to protect your hands from the chemical being measured.
- Waste Disposal: Dispose of any waste or contaminated solutions according to established laboratory protocols.
- Avoid Heating: Unless specifically designed for it, do not heat graduated cylinders. Heating can cause stress and cracking.
Following these precautions will minimize the risk of accidents and ensure the accurate and safe use of graduated cylinders in scientific and laboratory settings.
The Meniscus: Reading the Volume

Accurate volume measurement with a graduated cylinder hinges on understanding and correctly interpreting the meniscus. This curved surface, formed by the liquid within the cylinder, is crucial for obtaining precise readings. The following sections will detail the formation of the meniscus, the proper technique for reading it, and variations in its appearance depending on the liquid used.
Meniscus Formation
The meniscus is a curved surface that forms at the interface of a liquid and its container. This phenomenon arises due to the interplay of two types of intermolecular forces: adhesion and cohesion.Adhesion refers to the attraction between the liquid molecules and the molecules of the container (in this case, the glass of the graduated cylinder). Cohesion, on the other hand, is the attraction between the liquid molecules themselves.When the adhesive forces are stronger than the cohesive forces, as is the case with water and glass, the liquid “wets” the surface of the container, and the meniscus curves upwards along the sides of the cylinder, forming a concave meniscus.
Conversely, if the cohesive forces are stronger than the adhesive forces, the liquid does not wet the surface, and the meniscus curves downwards, forming a convex meniscus.
Reading the Meniscus
Precise measurement requires observing the meniscus at eye level. This ensures that parallax error, which can occur when the observer’s eye is not level with the liquid surface, is minimized.Here’s the recommended procedure:
- Place the graduated cylinder on a flat, stable surface.
- Position your eye at the same level as the meniscus. Squatting or raising the cylinder to eye level may be necessary.
- Observe the lowest point of the meniscus (for concave menisci, as is typical with water).
- Read the volume indicated by the scale markings at that lowest point.
- Record the volume, including all certain digits and one estimated digit. For example, if the smallest marking on the cylinder is 1 mL, record the volume to the nearest 0.1 mL (e.g., 25.3 mL).
Meniscus Appearance for Different Liquids
The shape of the meniscus varies depending on the liquid’s properties. The most common example is the difference between water and mercury.Water, due to its strong adhesive forces with glass, forms a concave meniscus. This means the liquid curves upwards along the sides of the cylinder. Mercury, however, has stronger cohesive forces than adhesive forces with glass.The following provides a comparison:
- Water: Forms a concave meniscus. The lowest point of the curve is used for the volume reading.
- Mercury: Forms a convex meniscus. The highest point of the curve is used for the volume reading.
- Other Liquids: The meniscus shape depends on the relative strengths of adhesive and cohesive forces. For many organic solvents, the meniscus will be similar to water, although the curvature may be less pronounced.
The accurate determination of the volume of the liquid is critical for precise measurements.
Measuring Liquids

Accurate measurement of liquid volumes is crucial in scientific experiments and everyday applications. Precise measurements are essential for ensuring the reliability of experimental results and the proper functioning of various processes. This section provides a detailed guide on the step-by-step procedure for measuring liquid volumes using a graduated cylinder, common measurement errors, and techniques to minimize them.
Step-by-Step Procedure for Measuring Liquid Volume
The following steps Artikel the proper method for accurately measuring a liquid volume using a graduated cylinder. Following these steps ensures accurate and reliable results.
- Select the Correct Graduated Cylinder: Choose a graduated cylinder of an appropriate size for the volume you intend to measure. The cylinder should be slightly larger than the expected volume to avoid overfilling and improve measurement accuracy. For instance, if you anticipate measuring approximately 25 mL of liquid, a 50 mL graduated cylinder would be suitable.
- Prepare the Cylinder and Liquid: Ensure the graduated cylinder is clean and dry. If the cylinder is wet, residual water can dilute the liquid being measured, leading to inaccurate results. Place the graduated cylinder on a level surface. Pour the liquid into the cylinder, ensuring the liquid level is below the desired volume initially.
- Position Yourself Correctly: Position yourself at eye level with the meniscus of the liquid. This is critical for accurate reading. Squat or adjust the cylinder’s height to align your eyes with the liquid’s surface.
- Observe the Meniscus: The liquid’s surface will curve due to surface tension, forming a meniscus. The meniscus is the curved upper surface of the liquid. For most liquids, the meniscus curves downward. Observe the bottom of the meniscus.
- Read the Volume: Read the volume at the bottom of the meniscus. Note the graduations on the cylinder and interpolate between the markings if necessary. Record the volume, including the appropriate units (e.g., mL). For example, if the meniscus aligns with the 25 mL mark, record the volume as 25.0 mL.
- Remove the Liquid (If Required): If you need to transfer the liquid, carefully pour the measured volume into the receiving container. Be mindful of any liquid adhering to the cylinder walls.
Common Measurement Errors and Avoidance
Several factors can contribute to errors in liquid volume measurement. Recognizing these potential errors and employing techniques to mitigate them is essential for obtaining accurate results.
- Parallax Error: Parallax error occurs when the observer’s eye is not at the same level as the liquid’s meniscus. Reading the volume from an angle results in an inaccurate measurement. To avoid parallax error, ensure your eye is at eye level with the meniscus.
- Incorrect Cylinder Size: Using a graduated cylinder that is too large or too small for the liquid volume can lead to errors. If the cylinder is too large, the graduations may be too far apart, making precise reading difficult. If the cylinder is too small, it may require multiple additions of liquid, increasing the chance of error. Always select a cylinder that is slightly larger than the expected volume.
- Meniscus Misinterpretation: Failing to read the volume at the correct point on the meniscus can introduce errors. Always read the volume at the bottom of the meniscus.
- Contamination: Using a dirty or wet graduated cylinder can contaminate the liquid being measured and affect the accuracy of the volume measurement. Always use a clean and dry graduated cylinder.
- Incorrect Reading of Graduations: Misreading the graduated cylinder’s markings can lead to significant errors. Pay close attention to the scale and interpolate accurately between the markings.
Comparison of Pouring Methods into a Graduated Cylinder
The method used to pour the liquid into the graduated cylinder can influence the accuracy and efficiency of the measurement process. The following table compares different pouring techniques.
| Method | Description | Advantages | Disadvantages |
|---|---|---|---|
| Direct Pouring | Pouring the liquid directly from the source container into the graduated cylinder. | Quick and straightforward. Suitable for general volume transfer. | Risk of splashing and potential for overfilling. Less accurate for precise measurements. |
| Pouring with a Pipette | Using a pipette to transfer the liquid into the graduated cylinder. | Allows for very precise volume control. Minimizes the risk of overfilling. | Slower process. Requires a pipette and associated equipment (e.g., bulb or pump). |
| Pouring with a Beaker as a Buffer | Pouring the liquid into a beaker first, then carefully transferring it from the beaker into the graduated cylinder. | Reduces the risk of splashing compared to direct pouring. Provides more control over the flow. | Requires an extra container (beaker). Might introduce slight inaccuracies due to liquid remaining in the beaker. |
| Pouring with a Funnel | Using a funnel to guide the liquid into the graduated cylinder. | Reduces the risk of spills and allows for controlled pouring. | May introduce air bubbles. Cleaning the funnel can be time-consuming. Not ideal for small volumes. |
Common Applications of Graduated Cylinders

Graduated cylinders are indispensable tools in a wide array of scientific disciplines and everyday applications, providing a reliable means of measuring liquid volumes. Their accuracy and ease of use make them essential for both precise laboratory experiments and common household tasks. Understanding the diverse applications of graduated cylinders highlights their significance in various fields and practical scenarios.
Scientific Fields and Experiments
Graduated cylinders are fundamental tools across numerous scientific disciplines, playing a critical role in experiments requiring accurate liquid volume measurements. Their use is widespread, supporting the integrity and reproducibility of research findings.
- Chemistry: In chemistry, graduated cylinders are used extensively in a variety of experiments. For instance, in titrations, they are used to measure the volume of a titrant (a solution of known concentration) added to a sample until a reaction is complete. They are also crucial for preparing solutions of specific concentrations, where precise volumes of solvents and solutes are required.
- Biology: Biology experiments often involve measuring liquid volumes for various purposes. In cell culture, for example, graduated cylinders are used to measure the precise volume of media needed to grow cells. In experiments involving enzyme kinetics, they help measure the volumes of reactants and products, allowing researchers to study reaction rates.
- Pharmacology: Pharmacological studies rely on graduated cylinders to accurately measure liquid medications, diluents, and other solutions. They are essential in preparing drug formulations and administering precise doses in both research and clinical settings.
- Environmental Science: Environmental scientists utilize graduated cylinders for analyzing water samples and measuring liquid volumes in various environmental tests. They are used in tests such as measuring the volume of water samples for assessing pollutant concentrations and analyzing soil samples.
- Materials Science: In materials science, graduated cylinders are employed in the preparation of solutions, the mixing of reactants, and the analysis of materials properties. For instance, in polymer chemistry, they are used to measure the volumes of monomers and solvents needed to synthesize polymers.
Everyday Applications
Beyond scientific applications, the principles of graduated cylinder measurements are relevant in everyday scenarios, highlighting their practical utility.
- Cooking and Baking: In the kitchen, graduated cylinders are used to measure liquids for recipes. They offer a more accurate measurement than standard measuring cups, especially for small volumes of ingredients like extracts or oils. This precision can significantly impact the outcome of baking, where accurate measurements are crucial.
- Gardening: Gardeners utilize graduated cylinders to measure liquid fertilizers, pesticides, and other solutions. Accurate measurements ensure proper dilution and prevent over-application, which could harm plants.
- Home Brewing: For home brewers, graduated cylinders are essential for measuring water and other liquids needed to make beer or other alcoholic beverages. Accurate measurement of ingredients is essential to create the right proportions for the recipe.
- Aquarium Management: Aquarium enthusiasts use graduated cylinders to measure water conditioners, medications, and other additives. Precise measurements are necessary to maintain the correct water chemistry and ensure the health of aquatic life.
Practical Scenarios
Graduated cylinders are indispensable tools in various practical scenarios, providing accuracy and ease of use.
- Preparing Medicines: Measuring the correct dosage of liquid medications, especially for children, is crucial. Graduated cylinders allow for precise measurement of small volumes.
- Mixing Cleaning Solutions: Creating effective cleaning solutions at home requires the correct ratios of water and cleaning agents. Graduated cylinders enable accurate mixing.
- Creating DIY Projects: Whether it’s mixing epoxy resins, making homemade soaps, or experimenting with other DIY projects, graduated cylinders provide precise measurements.
- Scientific Demonstrations: Graduated cylinders are ideal for educational demonstrations in schools and for science kits, providing clear visual aids for volume measurement.
Troubleshooting Measurement Issues
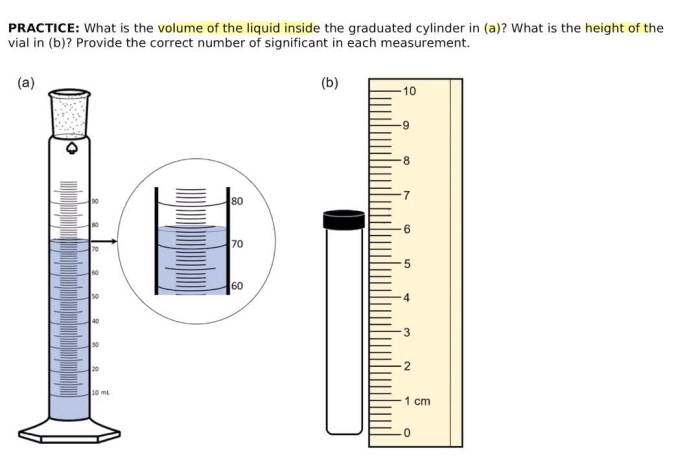
Accurate measurement using a graduated cylinder is crucial for the reliability of experimental results. However, various factors can lead to measurement errors. This section addresses common issues, their causes, and practical solutions to ensure precise volume determination.
Common Measurement Errors and Their Causes
Several factors can compromise the accuracy of graduated cylinder measurements. Understanding these potential pitfalls is the first step toward achieving reliable results.
- Parallax Error: This occurs when the observer’s eye is not level with the meniscus. Viewing the meniscus from an angle results in an inaccurate volume reading.
- Meniscus Misinterpretation: Incorrectly reading the meniscus, either the top or bottom of the curve, can lead to significant errors. For transparent liquids, the bottom of the meniscus is typically used, while for opaque liquids, the top is used.
- Improper Cylinder Cleaning: Residue from previous experiments or contaminants on the cylinder’s inner surface can alter the volume measurement by affecting the liquid’s adhesion to the glass.
- Temperature Effects: The volume of a liquid can change with temperature. Measurements taken at significantly different temperatures than the cylinder’s calibration temperature may introduce errors due to thermal expansion or contraction.
- Incorrect Cylinder Selection: Using a graduated cylinder that is too large or too small for the volume being measured can decrease accuracy. A cylinder should be chosen so the measured volume is close to its full capacity.
- Air Bubbles: The presence of air bubbles adhering to the cylinder’s inner walls or within the liquid itself can distort the volume reading.
- Incorrect Pouring Technique: Pouring liquid too quickly can lead to splashing and volume loss. Similarly, pouring against the cylinder’s wall can cause the liquid to cling, affecting the reading.
Solutions and Troubleshooting Tips
Addressing measurement inaccuracies requires a systematic approach. The following tips can help mitigate the errors discussed above.
- Eliminating Parallax Error: Ensure the observer’s eye is at the same level as the meniscus. Place the cylinder on a flat surface and bring your eye level with the liquid’s surface. A white card or a piece of paper behind the cylinder can also make the meniscus more visible.
- Proper Meniscus Reading: Carefully observe the meniscus and read the volume at the bottom of the curve for transparent liquids. For opaque liquids, read the top of the meniscus.
- Thorough Cleaning: Clean the graduated cylinder thoroughly with appropriate solvents and detergents between each use. Rinse thoroughly with distilled water to remove any residual cleaning agents.
- Temperature Considerations: Note the liquid’s temperature when making measurements, especially if temperature variations are expected. If possible, measure the liquid and cylinder at the same temperature. For highly accurate work, calibrate the cylinder at the working temperature.
- Selecting the Right Cylinder: Choose a graduated cylinder with a capacity close to the volume being measured. Using a smaller cylinder allows for more precise measurements.
- Bubble Management: Tap the cylinder gently to dislodge air bubbles adhering to the walls. Allow the liquid to settle before taking a reading.
- Controlled Pouring: Pour liquids slowly and steadily, directing the stream down the cylinder’s side to minimize splashing and ensure accurate delivery.
Proper Handling and Storage Procedures
Proper handling and storage are essential for preserving the integrity and lifespan of graduated cylinders.
- Handling: Handle graduated cylinders with care. Avoid dropping or subjecting them to sudden temperature changes, as this can cause breakage.
- Cleaning: Clean the graduated cylinder immediately after use. Avoid letting liquids dry inside the cylinder, as this can make cleaning more difficult and potentially damage the glass.
- Storage: Store graduated cylinders in a clean, dry place, away from direct sunlight and extreme temperatures. Ensure they are stored upright to prevent accidental spills and damage.
- Inspection: Regularly inspect the graduated cylinder for cracks, chips, or other damage. Discard any damaged cylinders, as they may compromise measurement accuracy and pose a safety hazard.
- Labeling: Clearly label graduated cylinders with their contents or the experiments they are used for, to prevent cross-contamination and ensure proper usage.
Outcome Summary

And so, our journey through the world of graduated cylinders comes to a close. We’ve uncovered the secrets of accurate measurement, from the careful selection of the cylinder to the precise reading of the meniscus. We’ve learned the importance of preparation, the nuances of liquid displacement, and the crucial role of precision in scientific endeavors. Remember that mastery of this skill is more than just following steps; it’s about cultivating a keen eye, a steady hand, and an unwavering commitment to accuracy.
Now, armed with this knowledge, go forth and measure with confidence, knowing that you hold the power to unlock the secrets of the world, one precisely measured drop at a time.
Frequently Asked Questions
Why is it important to use the right size graduated cylinder?
Using a graduated cylinder that’s too large will decrease the accuracy of your measurement, as the markings will be further apart. Conversely, a cylinder that’s too small may lead to spills or the need for multiple measurements, increasing the risk of error.
What is the best way to clean a graduated cylinder?
Rinse the cylinder with distilled water and, if necessary, use a mild detergent. For stubborn residue, use a long-handled brush specifically designed for glassware. Always rinse thoroughly to remove all traces of detergent before use.
What if I accidentally pour too much liquid into the graduated cylinder?
If you’ve poured in too much liquid, do not pour the excess back into the original container, as this could contaminate it. Instead, carefully pour the excess into a designated waste container and start the measurement again, ensuring you are using the correct volume.
How can I tell if my graduated cylinder is accurate?
You can check the accuracy of your graduated cylinder by measuring a known volume of water and comparing it to the cylinder’s reading. A precise measurement is considered accurate if the measured value matches the known volume within an acceptable margin of error. Calibration may be required for precise measurements.


